From time to time I struggle with long periods of feeling depressed and lethargic. Even when I start to look forward to new possibilities, I just can't seem to find the energy. I've tried getting more sleep, less sleep, eating consistently, avoiding carbs, and exercise. Each of these things only seem to yield minor, temporary improvements to my energy level.
I gained an insight one night when I was sitting at my laptop, writing a journal entry. I was having some exciting ideas, and as I started writing them down I noticed that I went from tired and lethargic to jittery and restless. I felt like running and jumping around but that wasn't really an option in a small room at 1am with other people sleeping nearby. So I kept typing. Whenever I stopped I felt really frustrated. It was as if I had to concentrate really hard to keep up with myself.
Eventually I ran out of words. The jitters stuck around for a while, then I went back to feeling very tired. Something about this experience was familiar. That's when it clicked: the constant lethargic feeling was a result of too much energy with no place to go. I desperately wanted to be active physically, mentally, and creatively, but if I didn't know how to channel all that energy I would just shut down instead. And trust me, being in "zombie mode" for extended periods of time does not feel good.
So now I know that the solution to feeling constantly lethargic involves coming up with the appropriate channel for any energy that I happen to have stored up. Once I tap into it, it seems to be almost never ending. I've experienced this every time I get really absorbed with an interest. I'd love to hear from others if they have had simiar experiences and what they find helps most when their energy levels are low.
Monday, February 29, 2016
Saturday, February 27, 2016
How Being a Slow Learner Made Me a Better Tutor
I am a slow learner. Despite loving math, when I first started at a community college I placed into intermediate algebra. Luckily I had an awesome professor, but it still took a huge amount of study time for the material to really sink in. (Interestingly, as I got into higher math, I actually found it easier and easier to absorb new material, even though the material itself was getting harder. I suspect this is because, with practice, I became more proficient in the specific mental processes involved in picking up mathematical concepts.)
The upside of being a slow learner became clear to me when I began tutoring others in math. The student would ask a question, or I would identify from observable patterns which concept the student was struggling with and immediately remember when I was confused about the same thing. More importantly, I would recall exactly how I got from not understanding the concept to understanding it. This allowed me to connect with the student from their starting place and use guiding questions to lead them through a very similar process.
Tutors who tended to pick up new concepts almost instantaneously often seem to have a harder time when students don't understand their initial explanation of how a problem is solved. I've even had a fellow tutor ask me how I found the patience for students that didn't grasp things after multiple explanations. From their perspective, if the student didn't understand their explanation they couldn't understand why not, nor could they figure out how to break things down any further. Perhaps my patience for others developed as a result of needing to have so much patience for myself.
Whenever asking guiding questions during a tutoring session, my goal is to get the student to think. If the questions are too easy, I risk just giving the answers away, and the student is taking my word for it on some level rather than thinking through the problem themselves. If I make the questions too hard, the student is just as stuck as they were initially. They aren't thinking in that case either; they're frozen. What I usually do is start with the more far reaching questions, then if the student is still stuck I keep breaking the questions down into smaller parts until they begin to make headway. The better I can analyse my own learning processes, the finer the pieces that I can break problems into for others.
This concept of starting where a person is and leading them through a solution applies to giving people advice as well. I remember giving a someone with social anxiety advice on how to ask a guy out. I could get very detailed with the steps, address every fear, explain how it was possible and worthwhile without sugar coating anything or discounting the risks. The reason my advice was helpful in this case is because I, too, have social anxiety and have been in the same situation where I was trying to teach myself to ask guys out. I had to work very hard to overcome my own fears, and I had little guidance for how to do so, as unfortunately I hadn't yet discovered the term "social anxiety" and the associated resources at that point.
People would try to give me advice when I described my difficulty, but one of two things would happen. First and by far the most common, they would tell me to just do it. They might have one or two tips (usually the same ones I already found from a google search), but when I tried to get more details they would either look sorry for me, tell me I was making it too complicated, or revert to saying "It's hard for everyone, just do it". The other reaction came from people who didn't quite know how to accomplish the task either. They tended to be more helpful as they would take the time to seriously consider my questions, but again there were a lot of missing pieces as their advice was mostly theoretical.
From this I could conclude that one can give the most useful advice when one has experienced the same issue to a comparable degree and figured out how to solve it through personal experience. In addition, the harder one had to work at resolving the issue, the more details are readily available for communication later. Since every one is unique and has different strengths and weaknesses, it can sometimes be hard to find the perfect person to get advice from, especially if one is struggling more with something than the general population. That's why support networks are so useful; you can find others who have dealt with similar issues and thereby increase your chances of getting useful advice. In addition, it can help counteract the feelings of alienation that can occur after spending many years surrounded by others that don't seem to struggle with the same things. For social anxiety I recommend this support forum which I found incredibly useful.
Wednesday, February 24, 2016
Music as Transformation
One thing I began to notice is that different types of music will resonate with me depending on my mental and emotional state. One of the reasons I love Beethoven's music is that it can go from one extreme of emotion to another without effort. And an interesting effect would happen sometimes; I'd be in a mood where the intense beginning would resonate with me, and I would feel very connected to the music. Then, it would later shift gracefully to a peaceful section... and my own internal state would shift right along with it.
And yet, when I would try listening to a completely "peaceful" piece when I'm in an "intense" mood, it just wouldn't work. It would feel off, empty. I would get irritated, then switch to heavy metal. Just as with teaching and tutoring (see my previous post on the topic) or a well written story, in order for music to transform the listener, it has to first make a connection with their initial state. Then, the more believable or smooth the transition to another state, the more likely a transformation will occur.
It occurred to me that I could use music as a way to intentionally transform pain or a bad mood into a more positive mindset. Unfortunately, the majority of the songs I own tend to stick to just one "mood" throughout, and the ones that did switch between moods might not have the exact effect I was looking for. So I created five different playlists and filled them with my favourite songs, numbered in order of "happiness level". So playlist 1 would have songs that resonated with me when I felt intense pain, anger, and other similar emotions, playlist 2 had sad songs, playlist 3 bitter-sweet songs, playlist 2 was upbeat, and playlist 1 contained the most joyful, celebratory songs I could find.
Once my playlists were created, I began to test them out in practice. Whenever I would find myself in a bad mood and feeling like some music, I would choose the playlist that seemed to resonate most with me at that particular time. After a few songs I'd switch to the next level up, and so on. Finding the right amount of time to spend on each playlist was a little tricky. Too short and the transition would feel far too abrupt. Too long and I'd risk reinforcing a bad mood. In general though between two and four songs from each playlist seemed to work well for me.
My results: A consistent and noticeable improvement. In most cases bringing myself from a 2 to a 4 was pretty easy. On rare occasions I was able to go from a 1 to a 5, but it was time consuming. Occasionally I could identify a good "transition song" that would help me move more smoothly from, say, playlist 2 to playlist 3. When I couldn't manage that, switching playlists would feel a little uncomfortable at first. With a little concentration I could get back in the flow after a few minutes, perhaps because the gap between the song and my mental state were minimal enough.
Side note: I can always tell whether a song is resonating with me or not based on my reaction to it and how closely I'm paying attention. For example, if I'm in a pretty good mood, Metallica's Unforgiven will either seem too intense and I'll switch to a different piece, or I'll think it's nice to hear, pay half attention, or analyse and admire it from a distance. If I happen to be feeling down about life, however, I'm guaranteed to have tears streaming down my face the instant it gets to the chorus.
Monday, February 22, 2016
First Salt Garden Experiment
When looking up easy to grow crystals, I found a great source of information on salt gardens (and many other awesome projects!) at waynesthisandthat.com, site owner Wayne Schmidt. I used the recipe which can be found here.
I was intrigued by the different variables that could affect the salt crystal growth, some of which were already described on the site. I decided to explore the effects of varying the amount of liquid bluing and ammonia. The amount of bluing would be either 4, 8, or 12 tbsp and the amount of ammonia would be either 4 tbsp, 2 tbsp, or none and then 8 tbsp added to the solution on the third day. Testing each combination gave me 9 different samples, which I labelled samples A through I. These are listed below under "sample amounts".
Note: This experiment lasted about two weeks. During that time, I measured humidities between 41 and 52% and temperatures between 66 and 77 degrees Fahrenheit in my closet where the samples were set.
Ingredients and materials:
-4 tbsp tap water
-4 tbsp table salt
-liquid bluing (see sample amounts)
-ammonia (see sample amounts)
-charcoal pieces
-vaseline
-plastic containers
-tbsp measure
-gloves
-goggles
Sample Amounts:
Sample A
4 tbsp liquid bluing
4 tbsp ammonia
Sample B
8 tbsp liquid bluing
4 tbsp ammonia
Sample C
12 tbsp liquid bluing
4 tbsp ammonia
Sample D
4 tbsp liquid bluing
2 tbsp ammonia
Sample E
8 tbsp liquid bluing
2 tbsp ammonia
Sample F
12 tbsp liquid bluing
2 tbsp ammonia
Sample G
4 tbsp liquid bluing
no ammonia then 8tbsp on 3rd day
Sample H
8 tbsp liquid bluing
no ammonia then 8tbsp on 3rd day
Sample I
12 tbsp liquid bluing
no ammonia then 8tbsp on 3rd day
Documentation:
Recipes completed at 4:00pm on 2/9/16.
After 2 hours: I sprinkled four pinches of salt on top of each of the charcoal pieces. (At this point, no visible crystals have started forming yet.) Sample A's solution has turned a dark, brownish red color, but all the other samples remain a dark blue.
After 4 hours (2 hours after additional salt was added): Crystal can be seen growing on top of all of the charcoal briquettes. Upon closer inspection, the brownish red solution of sample A is growing plenty of salt underneath the surface. Sample D's solution is turning a dark yellow, and sample B has patches of yellow as well. The liquid bluing appears to have settled to the bottom of each container. With the exception of samples G, H, and I, all the samples have at least some crystals forming on the edges of the briquettes and the bottom of the container.
After 48 hours: Most the samples look roughly the same as they did when I last checked. However, sample F has begun to clearly grow crystals upwards from the coal briquette.
After 72 hours (3 days):
In addition to sample F, samples A and D have also begun to acquire salt crystal growth. Sample A's growth has overtaken sample F, so far doing the best of the three.
After 96 hours (4 days):
Since it took a while for the solutions to evaporate, I waited until the 4th day (instead of the 3rd) to add more solution. Since none of the samples needed much additional liquid, I made a half recipe for each sample, except for samples F, H and I, for which I made quarter recipes.
Pictures were taken before adding the additional solution. At this point, all of samples A through F have vertical crystal growth except for sample C. Although samples G, H and I are not yet growing crystals in the vertical direction (probably since there is no ammonia in the solutions yet), they have changed somewhat since the first day; salt is forming over the surface of the briquettes, and has a sort of "crackle" appearance. There are also deposits of salt forming on the upper sides of the briquettes.
After 108 hours (4.5 days):
12 hours after adding the additional solution, noticeable salt crystal growth can be seen since the previous set of pictures. At this point, all 9 samples have some degree of vertical crystal growth. Samples G, H, and I have more feathery looking growths at this point, which have sprung up quite quickly. The solutions have a red tinge under the surface, much like sample A did at the very beginning of the experiment. These effects are likely due to the ammonia being added for the first time for these three samples, and to there being more of it than in any of the other samples.
Day 11: Samples A, G, and H appear to be doing the best at this point. Even the samples which have quite a bit of crystal growth, however, still have "soggy" patches. Perhaps the humidity is too high? Or the crystals were disturbed at some point and collapsed? I may experiment with a fan set to low in the future, as suggested in the original recipe. (I didn't want to use a fan for this first experiment as I didn't want it to blow across some samples more than others, skewing the results.) In contrast, samples B and C are lagging far behind the other samples, as they still only have a tiny dot of growth.
Day 13: Samples B and C have finally begun to develop a noticeable amount of salt crystal growth. Samples H and I have salt crystals growing on the sides of the container. These may soon grow right over the top. I only put vaseline on the sides about an inch above the solution, and the crystals seemed to have skipped right over this section and only grown above it. Interestingly, while all the samples have slightly soggy crystals forming on the briquettes, the crystals forming on the sides of H and I's containers are not soggy at all. They're also have a more rounded appearance rather than the feathery look of the crystals growing on the briquettes.
Overall, samples A, G, H, and I seem to have formed the largest growths, with sample A staying in the lead most steadily throughout the experiment. This suggests that the ratio suggested in the original recipe does quite well (sample A) and that adding the ammonia in after a few days may also be worth trying out (samples G, H, and I). Also worth noting; having higher ratios of bluing to ammonia seems to produce poorer results (samples B and C did worse when compared to sample A, and samples E and F did worse when compared to sample D).
Each samples on the 13th day:
While I took pictures of every sample at various intervals (4, 72, 96, 108 hours and days 11 and 13), it would take up too much space to include all of them here. So here is an example of the salt crystal growth for just sample A:
I was intrigued by the different variables that could affect the salt crystal growth, some of which were already described on the site. I decided to explore the effects of varying the amount of liquid bluing and ammonia. The amount of bluing would be either 4, 8, or 12 tbsp and the amount of ammonia would be either 4 tbsp, 2 tbsp, or none and then 8 tbsp added to the solution on the third day. Testing each combination gave me 9 different samples, which I labelled samples A through I. These are listed below under "sample amounts".
Note: This experiment lasted about two weeks. During that time, I measured humidities between 41 and 52% and temperatures between 66 and 77 degrees Fahrenheit in my closet where the samples were set.
Ingredients and materials:
-4 tbsp tap water
-4 tbsp table salt
-liquid bluing (see sample amounts)
-ammonia (see sample amounts)
-charcoal pieces
-vaseline
-plastic containers
-tbsp measure
-gloves
-goggles
Sample Amounts:
Sample A
4 tbsp liquid bluing
4 tbsp ammonia
Sample B
8 tbsp liquid bluing
4 tbsp ammonia
Sample C
12 tbsp liquid bluing
4 tbsp ammonia
Sample D
4 tbsp liquid bluing
2 tbsp ammonia
Sample E
8 tbsp liquid bluing
2 tbsp ammonia
Sample F
12 tbsp liquid bluing
2 tbsp ammonia
Sample G
4 tbsp liquid bluing
no ammonia then 8tbsp on 3rd day
Sample H
8 tbsp liquid bluing
no ammonia then 8tbsp on 3rd day
Sample I
12 tbsp liquid bluing
no ammonia then 8tbsp on 3rd day
Documentation:
Recipes completed at 4:00pm on 2/9/16.
 |
| the setup |
After 2 hours: I sprinkled four pinches of salt on top of each of the charcoal pieces. (At this point, no visible crystals have started forming yet.) Sample A's solution has turned a dark, brownish red color, but all the other samples remain a dark blue.
After 4 hours (2 hours after additional salt was added): Crystal can be seen growing on top of all of the charcoal briquettes. Upon closer inspection, the brownish red solution of sample A is growing plenty of salt underneath the surface. Sample D's solution is turning a dark yellow, and sample B has patches of yellow as well. The liquid bluing appears to have settled to the bottom of each container. With the exception of samples G, H, and I, all the samples have at least some crystals forming on the edges of the briquettes and the bottom of the container.
After 48 hours: Most the samples look roughly the same as they did when I last checked. However, sample F has begun to clearly grow crystals upwards from the coal briquette.
After 72 hours (3 days):
In addition to sample F, samples A and D have also begun to acquire salt crystal growth. Sample A's growth has overtaken sample F, so far doing the best of the three.
After 96 hours (4 days):
Since it took a while for the solutions to evaporate, I waited until the 4th day (instead of the 3rd) to add more solution. Since none of the samples needed much additional liquid, I made a half recipe for each sample, except for samples F, H and I, for which I made quarter recipes.
Pictures were taken before adding the additional solution. At this point, all of samples A through F have vertical crystal growth except for sample C. Although samples G, H and I are not yet growing crystals in the vertical direction (probably since there is no ammonia in the solutions yet), they have changed somewhat since the first day; salt is forming over the surface of the briquettes, and has a sort of "crackle" appearance. There are also deposits of salt forming on the upper sides of the briquettes.
 |
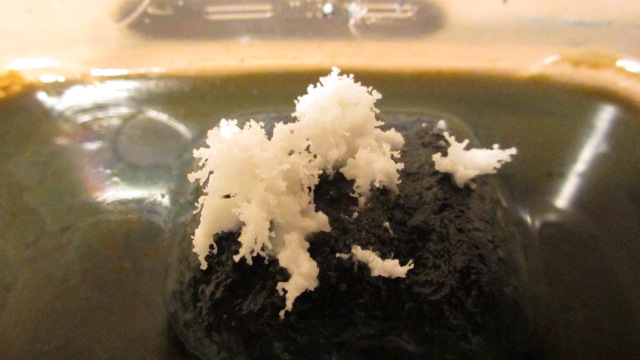
| Dry "crackle" appearance on sample H after 96 hours |
After 108 hours (4.5 days):
12 hours after adding the additional solution, noticeable salt crystal growth can be seen since the previous set of pictures. At this point, all 9 samples have some degree of vertical crystal growth. Samples G, H, and I have more feathery looking growths at this point, which have sprung up quite quickly. The solutions have a red tinge under the surface, much like sample A did at the very beginning of the experiment. These effects are likely due to the ammonia being added for the first time for these three samples, and to there being more of it than in any of the other samples.
Day 11: Samples A, G, and H appear to be doing the best at this point. Even the samples which have quite a bit of crystal growth, however, still have "soggy" patches. Perhaps the humidity is too high? Or the crystals were disturbed at some point and collapsed? I may experiment with a fan set to low in the future, as suggested in the original recipe. (I didn't want to use a fan for this first experiment as I didn't want it to blow across some samples more than others, skewing the results.) In contrast, samples B and C are lagging far behind the other samples, as they still only have a tiny dot of growth.
Day 13: Samples B and C have finally begun to develop a noticeable amount of salt crystal growth. Samples H and I have salt crystals growing on the sides of the container. These may soon grow right over the top. I only put vaseline on the sides about an inch above the solution, and the crystals seemed to have skipped right over this section and only grown above it. Interestingly, while all the samples have slightly soggy crystals forming on the briquettes, the crystals forming on the sides of H and I's containers are not soggy at all. They're also have a more rounded appearance rather than the feathery look of the crystals growing on the briquettes.
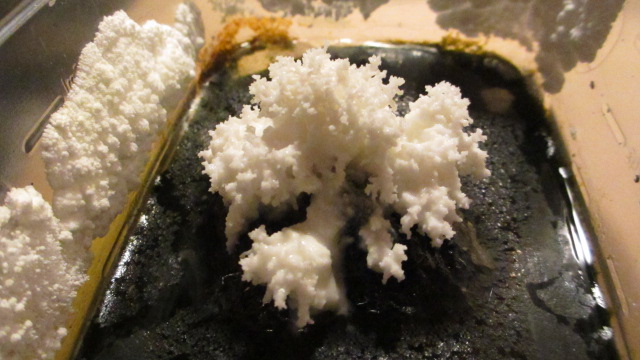
Overall, samples A, G, H, and I seem to have formed the largest growths, with sample A staying in the lead most steadily throughout the experiment. This suggests that the ratio suggested in the original recipe does quite well (sample A) and that adding the ammonia in after a few days may also be worth trying out (samples G, H, and I). Also worth noting; having higher ratios of bluing to ammonia seems to produce poorer results (samples B and C did worse when compared to sample A, and samples E and F did worse when compared to sample D).
Each samples on the 13th day:
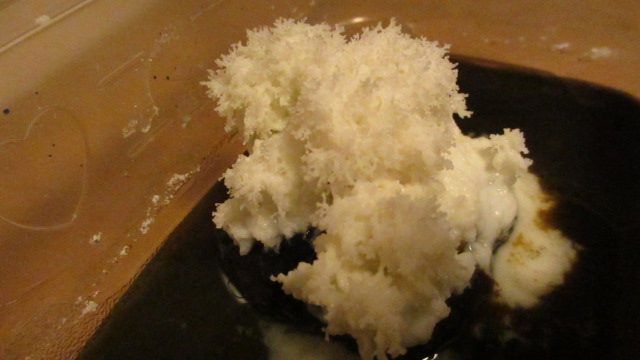 |
| Sample A |
 |
| Sample B |
 |
| Sample C |
 |
| Sample D |
 |
| Sample E |
 |
| Sample F |
 |
| Sample G |
 |
| Sample H |
 |
| Sample I |
While I took pictures of every sample at various intervals (4, 72, 96, 108 hours and days 11 and 13), it would take up too much space to include all of them here. So here is an example of the salt crystal growth for just sample A:
 |
| After 4 hours |
 |
| After 4 hours - closeup |
 |
| After 72 hours |
 |
| After 96 hours |
 |
| After 108 hours |
 |
| Day 11 |
 |
| Day 13 |
Friday, February 19, 2016
Short Poem
I found a short poem I wrote about three years ago.
And I am going to wander,
Until I chance encounter,
Those other brave lost souls,
Who walk the lonesome voids,
Between other people's cold unforgiving walls.
And I am going to wander,
Until I chance encounter,
Those other brave lost souls,
Who walk the lonesome voids,
Between other people's cold unforgiving walls.
Thursday, February 18, 2016
Mental Trick for Changing One's Personal Story
You may have heard the trick of imagining your ideal self and then imagining you are already that person (or thinking of your goal and then visualizing having it). This has to do with the idea that we are "talking to ourselves" all day in our heads, and that what we say to ourselves reflects our view of ourselves and what we're capable of - our personal stories. Rather than trying to change individual behaviours with a brute force method, we could instead change the internal story which led to the behaviours in the first place.
Unfortunately I have found that it often doesn't work to simply tell myself that I am the person I want to be. Perhaps this is because if I tell myself that, for example, I am someone who is always considerate and acts accordingly, this works right up until I do something from long standing habit which does not "fit" this model. Then the illusion is shattered and I fall back into my old story.
Perhaps I need to adjust the story of who I want to be such that it is compatible with the transition. In other words, make the goal not just some static standard of perfection, but an ideal process. So instead of, "I want to be someone who is always considerate", it would be more like, "I want to be someone who strives to be considerate, and when she does something inconsiderate takes the necessary action to learn from it and make things right." Notice that the former statement is unobtainable, and that the latter statement is completely doable.
There's a big issue of guilt in my personal stories. It seems I tell myself something like, "I want to be someone who never does anything she should feel guilty for". I describe the details of what I would do rather than state it this way, but that appears to be the underlying nature of the sentiment. Really, it is built upon the foundation of the concept of blame. If this concept is accepted, then I would always have to strive to be someone who acts in a blameless fashion. That is the supposed function of blame after all; to scare people into doing "the right thing" in order to avoid feeling guilty. Since there will always be people who blame even without good reason, avoiding it would be essentially impossible. My only alternatives would be to surround myself with a sufficient number of people who find me blameless in order to counteract this effect or to isolate myself from those who would blame me by labelling them as unreasonable or blameworthy themselves. These are common strategies, but short term solutions at best.
On a conscious level I choose to reject the blame/guilt model altogether. Guilt and self blame are not useful. They are counterproductive. They keep me stuck. I know this. Yet it appears to be the most difficult of all my thought patterns to break. There is an alternative world view; nobody is perfect. Everyone makes mistakes. The important thing is what we do after we make a mistake. Very cliche sounding, but how often do these concepts actually sink in? This view requires abstaining from blaming altogether, self and others. I can get quite far with not blaming others, but the circuit never quite completes itself when it comes to not blaming myself.
Doing something different and acknowledging something I regret seem to be... uncomfortable tasks at best. Unthinkable at worst. Why? If a person regrets what they did, wouldn't it be quite natural to state that something went wrong, why, and then implement a solution after the completion of their analysis? This would not require self hatred. It would not require unshakable guilt. It would simply require seeing that something went differently from the way one hoped, finding out why, and then looking for potential methods of improvement. Once again, the old blame model is standing in the way. But why is it so hard to shake, even conceptually?
One thing I find problematic is that, while internally the two perspectives could not be more different, externally I haven't figured out how to differentiate between them. I may design an action that I intend to take out of guiltless regret, no blame, just attempting to fix the miscommunication or poor technique. But this very action fits too easily into the blame model as well. My fear seems to be that it will look as though I have accepted the blame and the underlying assumptions; that I am a bad person, incompetent, irrational etc. The fear is that this will put me in a poor position in the future, as someone easily dismissed or looked down upon. Or others will think that by considering their needs so openly, I have decided to sacrifice my own, as would be dictated by the blame model.
(Note: there is likely something else at play as well which catapults me back into the blame model, as I often find self loathing springing up the instant I start actually considering the most logical mitigating action.)
So it appears I need a personal story that not only works for the transition process, but which also works for interfacing between the blame model that others might retain and my desired, guiltless regret model. That is, I need my new story to work without requiring others to accept the idea that blame is counterproductive and destructive and that change can be motivated quite easily without it.
I focused on one example in this post (overcoming guilt as an obstacle to becoming more considerate), but I'm sure the concept could be applied to just about any goal. The theory that seems to be emerging is that, when attempting to change one's personal story, the new story should meet a few requirements:
1) The goal should be realistically obtainable.
2) The new story needs to allow for a transition from the old story.
3) The new story needs to be compatible with other people's reactions and other effects.
Wednesday, February 17, 2016
Mental Tricks for Organizing
I like to take an analytical approach to organizing: sit down, write out the most efficient procedure to go through everything, and set up a sorting station. That usually involves coming up with categories of keep, trash, donate, and "belongs in x room". For example, if there are things in the dining room that belong in the kitchen, there will be a box labelled "kitchen" which later gets taken to the kitchen to be put away or sorted.
From experience, a "maybe" pile can be very helpful. Technically it doesn't seem like the most efficient thing to have, since one will end up looking at some of the same items more than once. However, it may speed up the decision making process. Anything where I have to pause to think about it, I just put it in the maybe pile instead of staring at it and creating a bottle neck. Then, once I've gone through everything else, I can go back to the maybe pile. Since I've seen everything else in the room, I have a better feel at this point for what I really need to hang onto. I have also had time to think about the item on a subconscious level, so that tends to gradually decrease my attachment to it.
As an example, I once went through about 500 books. They wouldn't fit on my shelves any more, not even double stacked. Many of the books were easy to make a decision about. However, there was a stack of over 100 books in the maybe pile. They were books I hadn't read yet and kept putting off, yet I kept telling myself I'd get around to it eventually. Or they were books I had read once that were mediocre, but I wasn't entirely convinced I wouldn't want to read it again someday. I let that pile sit overnight. In the morning, I didn't have to look again at any of them, I just immediately got rid of the whole pile. The logic was that it didn't make sense to keep a book I wasn't looking forward to reading, and it was so much easier to come to terms with that once rather than to go through it 100 times over.
I stumbled on another mental trick when I was trying to tidy up my room. I had formulated a plan for where everything would go and the most efficient order to complete tasks. And yet... I just couldn't seem to get into the process of cleaning my room. I knew exactly where the logical place to start was, but it was like pulling teeth trying to get myself to do it. The breakthrough came when I moved my music stand out of the main path. All of a sudden, it felt like I could move around easier. I cleared everything out of the path, then began dividing items up into general categories (books, clothes, cds, papers, etc.) and piled them up in various corners of the room. As soon as I did that, I was able to proceed easily with my original plan of action. I suspect the reason I kept getting stuck was because the clutter in my room was visually overwhelming, and clearing a space made it more manageable. Not to mention easier to walk.
Tuesday, February 16, 2016
Epsom Salt Crystals - Evaporation Method
Several sites suggest using a sponge or other porous material to give crystals something to grow on. Also, I noticed that while most recipes suggest a 1:1 ratio of water to epsom salts, some suggest a 2:1 ratio, so I decided to try this out and see if it worked.
Ingredients and materials:
1/2 cup water
1/4 cup epsom salts
sponge
container
food coloring (optional)
Recipe:
1) Heat the water (until it's not quite boiling), then mix in the epsom salts until dissolved. Optional: mix in food coloring.
2) Pour the mixture over a sponge in a small container.
3) Place in a warm, dry location and wait several days.
Documentation:
I made four bowls for the evaporation method, one without food coloring, and one with blue, red, and green food coloring respectively. I put three drops of each color directly onto each sponge and another drop mixed in with the water. The recipe was completed at 9:00pm on 2/7/16.
Note: I got a humidity and temperature monitor which collects the high and low temperature and humidity readings over the course of 36 hours. My closet, where I kept the samples, had a temperature of between 72 and 77 degrees Fahrenheit, and a humidity level of between 41 and 50%.
On day 4: Three of the bowls appear the same (except with perhaps a little of the solution evaporated off), but the red sample has formed crystals across the entire surface of the solution.
On day 6: The red sample did not change noticeably since day 4. I suspect this is because the crystals that formed over the surface trapped the liquid underneath without any exposure to air. This would mean it couldn't evaporate any further and thus no new crystals could form. The clear and blue samples were starting to resemble the red sample. However, there were pockets where the crystals had not completely covered the surface and epsom salt "needles" can be seen forming.
The green sample is the most interesting. The sponge appears to be serving its intended purpose; drawing the solution up through capillary action such that salt crystals form on the surface of the sponge. Less liquid remained in the container at this point, indicating that either more of it was held by the sponge or that it has evaporated off more quickly than the other samples. Again, epsom salt needles can be seen forming in the remaining liquid. They are more pronounced than the ones in the blue or clear samples.
The likely reason that the green sample is having the desired results is that the container is shaped slightly differently. At the beginning of the experiment, the depth of the solution for the other samples was such that the sponges either floated in the liquid or were submerged beneath the surface of it. The green sample is the only one where the sponge sat on the bottom of the container with the liquid not quite covering the top. This would provide for an exposed surface for crystals to form on and allow evaporation to continue as more solution was drawn up through the sponge.
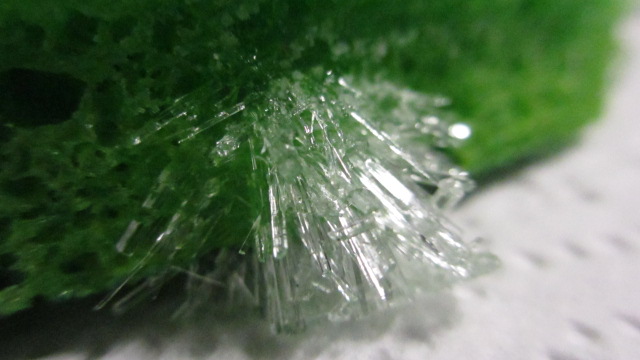
Day 8: Since the solution had almost completely evaporated off of the green sample, I decided to end the experiment at this point and examine the crystals.
Here's a close up of one of the surface crystals. It was extremely thin and delicate, and I wasn't able to save it:

The crystals on top of the green sponge are quite small, but packed close together. They reminded me of some of the sugar crystals from the rock candy experiment:

In addition, spiky formations grew out of the sponge near the bottom:
There were also some really pretty crystal formations that I didn't see until I sifted them out with a fork.

This was the biggest one. It formed on the bottom of one of the rounded containers, which seemed to help shape its formation:


Here's one of the larger epsom salt "needles":

Some more formations:


In addition, there were a bunch of smaller, separate epsom salt needles which formed under at the bottom of each container. I sifted them out with a fork, dried them and put them in a pile. A pink tint can be seen on some of them from the red food coloring:

The food coloring idea did not turn out too well; I would need to add way more than I did for the crystals to be colored. As it is, there is only a very slight red tint on some of the epsom salt needles and a faint blue tint on the largest crystal formation (which isn't noticeable in the pictures).
This time I did manage to apply two coats of clear nail polish on several of the crystals to help preserve them (many sites say they will turn white over time otherwise). Letting them sit for a few hours on a paper towel seemed to help their structural integrity such that they could be handled long enough to apply the nail polish. One still needs to be quite gentle, however. I did lose a few spines here and there during the process.
I put the pile of epsom salt needles in a small zip lock bag for safe keeping. I'm planning on using them for a future experiment, since "seed crystals" can help speed up the crystal growing process and provide a site for the new crystals to begin forming.
Ingredients and materials:
1/2 cup water
1/4 cup epsom salts
sponge
container
food coloring (optional)
Recipe:
1) Heat the water (until it's not quite boiling), then mix in the epsom salts until dissolved. Optional: mix in food coloring.
2) Pour the mixture over a sponge in a small container.
3) Place in a warm, dry location and wait several days.
Documentation:
I made four bowls for the evaporation method, one without food coloring, and one with blue, red, and green food coloring respectively. I put three drops of each color directly onto each sponge and another drop mixed in with the water. The recipe was completed at 9:00pm on 2/7/16.
Note: I got a humidity and temperature monitor which collects the high and low temperature and humidity readings over the course of 36 hours. My closet, where I kept the samples, had a temperature of between 72 and 77 degrees Fahrenheit, and a humidity level of between 41 and 50%.
 |
| the setup |
On day 4: Three of the bowls appear the same (except with perhaps a little of the solution evaporated off), but the red sample has formed crystals across the entire surface of the solution.
 |
| red sample after 4 days |
On day 6: The red sample did not change noticeably since day 4. I suspect this is because the crystals that formed over the surface trapped the liquid underneath without any exposure to air. This would mean it couldn't evaporate any further and thus no new crystals could form. The clear and blue samples were starting to resemble the red sample. However, there were pockets where the crystals had not completely covered the surface and epsom salt "needles" can be seen forming.
 |
| blue sample after 6 days |
| clear sample after 6 days |
The green sample is the most interesting. The sponge appears to be serving its intended purpose; drawing the solution up through capillary action such that salt crystals form on the surface of the sponge. Less liquid remained in the container at this point, indicating that either more of it was held by the sponge or that it has evaporated off more quickly than the other samples. Again, epsom salt needles can be seen forming in the remaining liquid. They are more pronounced than the ones in the blue or clear samples.
 |
| green sample after 6 days |
Day 8: Since the solution had almost completely evaporated off of the green sample, I decided to end the experiment at this point and examine the crystals.
 |
| blue sample after 8 days |
 |
| red sample after 8 days |
| clear sample after 8 days |
 |
| green sample after 8 days |
Here's a close up of one of the surface crystals. It was extremely thin and delicate, and I wasn't able to save it:

The crystals on top of the green sponge are quite small, but packed close together. They reminded me of some of the sugar crystals from the rock candy experiment:

In addition, spiky formations grew out of the sponge near the bottom:

There were also some really pretty crystal formations that I didn't see until I sifted them out with a fork.

This was the biggest one. It formed on the bottom of one of the rounded containers, which seemed to help shape its formation:


Here's one of the larger epsom salt "needles":

Some more formations:


In addition, there were a bunch of smaller, separate epsom salt needles which formed under at the bottom of each container. I sifted them out with a fork, dried them and put them in a pile. A pink tint can be seen on some of them from the red food coloring:

The food coloring idea did not turn out too well; I would need to add way more than I did for the crystals to be colored. As it is, there is only a very slight red tint on some of the epsom salt needles and a faint blue tint on the largest crystal formation (which isn't noticeable in the pictures).
This time I did manage to apply two coats of clear nail polish on several of the crystals to help preserve them (many sites say they will turn white over time otherwise). Letting them sit for a few hours on a paper towel seemed to help their structural integrity such that they could be handled long enough to apply the nail polish. One still needs to be quite gentle, however. I did lose a few spines here and there during the process.
I put the pile of epsom salt needles in a small zip lock bag for safe keeping. I'm planning on using them for a future experiment, since "seed crystals" can help speed up the crystal growing process and provide a site for the new crystals to begin forming.
Monday, February 15, 2016
Sugar Crystals Experiment - Rock Candy
Recipe:
There is a plethora of recipes for rock candy which can be found online. I used a recipe from sciencebob.com which can be found here. I wound up using 1.5 cups of water and 3.5 cups of sugar instead of the suggested 1 cup of water and 2-3 cups of sugar. I probably could have dissolved more sugar, but I ran out. I ended up with enough solution to fill two separate glasses.
Documentation:
I added 1tsp of vanilla extract to the solution. I attempted to add "seed crystals" to the first skewer, but unfortunately I didn't wait long enough for the sugar to dry completely and it fell off when put in the solution. I left the second skewer plain. The skewers were set at 5pm on 2/8/16.
After 28 hours I checked on the sugar crystals. At this point, crystals were beginning to form on the bamboo skewers. Unfortunately sugar was also solidifying on the edges, top, and bottom of the glass. In the first glass the crystals were smaller on the skewer and there were larger blocks of sugar on the bottom of the glass when compared to the second glass. This is likely because with the first skewer the sugar grains that fell off the skewer provided seed crystals on the bottom of the glass where I didn't want them and lead to fewer crystals growing on the skewer.
For each glass, I cracked the sugar on the surface and gently removed the skewer. Then I poured the solution into a bowl using a spoon to filter out the larger pieces of sugar crystals floating in the solution. Then I rinsed the glass and soaked for a few minutes in hot water and a little dish detergent. This dissolved the blocks of sugar on the bottom. I poured the solution back into the clean glass and replaced the skewer. Some solution was lost during this process.
The next day, about 48 hours after the start of the experiment, the glasses had again filled with blocks of sugar, even more than the previous day. I decided to end the crystal growth at this point as there wasn't much solution left after again filtering out the excess crystals. I gently removed the skewers and hung them over empty glasses to let the excess solution drip off. The second skewer grew significantly larger crystals than the first one. Another reason for this may be that the first glass was thinner, which may have contributed to the sugar blocks clogging it up faster.
Close ups of the crystals:


There is a plethora of recipes for rock candy which can be found online. I used a recipe from sciencebob.com which can be found here. I wound up using 1.5 cups of water and 3.5 cups of sugar instead of the suggested 1 cup of water and 2-3 cups of sugar. I probably could have dissolved more sugar, but I ran out. I ended up with enough solution to fill two separate glasses.
Documentation:
I added 1tsp of vanilla extract to the solution. I attempted to add "seed crystals" to the first skewer, but unfortunately I didn't wait long enough for the sugar to dry completely and it fell off when put in the solution. I left the second skewer plain. The skewers were set at 5pm on 2/8/16.
 |
| the setup |
After 28 hours I checked on the sugar crystals. At this point, crystals were beginning to form on the bamboo skewers. Unfortunately sugar was also solidifying on the edges, top, and bottom of the glass. In the first glass the crystals were smaller on the skewer and there were larger blocks of sugar on the bottom of the glass when compared to the second glass. This is likely because with the first skewer the sugar grains that fell off the skewer provided seed crystals on the bottom of the glass where I didn't want them and lead to fewer crystals growing on the skewer.
For each glass, I cracked the sugar on the surface and gently removed the skewer. Then I poured the solution into a bowl using a spoon to filter out the larger pieces of sugar crystals floating in the solution. Then I rinsed the glass and soaked for a few minutes in hot water and a little dish detergent. This dissolved the blocks of sugar on the bottom. I poured the solution back into the clean glass and replaced the skewer. Some solution was lost during this process.
 |
| blocks of sugar forming in the glass |
 |
| one of the skewers after 28 hours in the solution |
The next day, about 48 hours after the start of the experiment, the glasses had again filled with blocks of sugar, even more than the previous day. I decided to end the crystal growth at this point as there wasn't much solution left after again filtering out the excess crystals. I gently removed the skewers and hung them over empty glasses to let the excess solution drip off. The second skewer grew significantly larger crystals than the first one. Another reason for this may be that the first glass was thinner, which may have contributed to the sugar blocks clogging it up faster.
 |
| first skewer after 48 hours |
 |
| second skewer after 48 hours |
Close ups of the crystals:


Subscribe to:
Posts (Atom)