Ingredients and materials:
1/2 cup water
1/4 cup epsom salts
sponge
container
food coloring (optional)
Recipe:
1) Heat the water (until it's not quite boiling), then mix in the epsom salts until dissolved. Optional: mix in food coloring.
2) Pour the mixture over a sponge in a small container.
3) Place in a warm, dry location and wait several days.
Documentation:
I made four bowls for the evaporation method, one without food coloring, and one with blue, red, and green food coloring respectively. I put three drops of each color directly onto each sponge and another drop mixed in with the water. The recipe was completed at 9:00pm on 2/7/16.
Note: I got a humidity and temperature monitor which collects the high and low temperature and humidity readings over the course of 36 hours. My closet, where I kept the samples, had a temperature of between 72 and 77 degrees Fahrenheit, and a humidity level of between 41 and 50%.
 |
| the setup |
On day 4: Three of the bowls appear the same (except with perhaps a little of the solution evaporated off), but the red sample has formed crystals across the entire surface of the solution.
 |
| red sample after 4 days |
On day 6: The red sample did not change noticeably since day 4. I suspect this is because the crystals that formed over the surface trapped the liquid underneath without any exposure to air. This would mean it couldn't evaporate any further and thus no new crystals could form. The clear and blue samples were starting to resemble the red sample. However, there were pockets where the crystals had not completely covered the surface and epsom salt "needles" can be seen forming.
 |
| blue sample after 6 days |
| clear sample after 6 days |
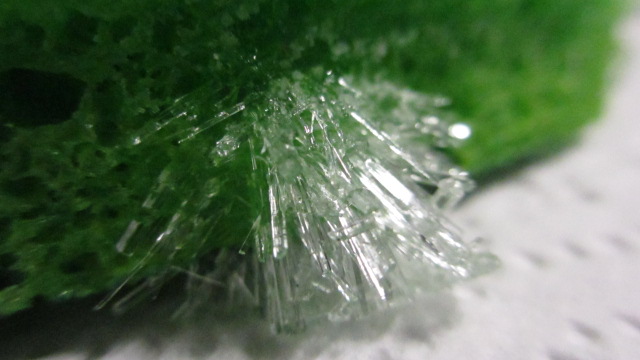
The green sample is the most interesting. The sponge appears to be serving its intended purpose; drawing the solution up through capillary action such that salt crystals form on the surface of the sponge. Less liquid remained in the container at this point, indicating that either more of it was held by the sponge or that it has evaporated off more quickly than the other samples. Again, epsom salt needles can be seen forming in the remaining liquid. They are more pronounced than the ones in the blue or clear samples.
 |
| green sample after 6 days |
Day 8: Since the solution had almost completely evaporated off of the green sample, I decided to end the experiment at this point and examine the crystals.
 |
| blue sample after 8 days |
 |
| red sample after 8 days |
| clear sample after 8 days |
 |
| green sample after 8 days |
Here's a close up of one of the surface crystals. It was extremely thin and delicate, and I wasn't able to save it:

The crystals on top of the green sponge are quite small, but packed close together. They reminded me of some of the sugar crystals from the rock candy experiment:

In addition, spiky formations grew out of the sponge near the bottom:
There were also some really pretty crystal formations that I didn't see until I sifted them out with a fork.

This was the biggest one. It formed on the bottom of one of the rounded containers, which seemed to help shape its formation:


Here's one of the larger epsom salt "needles":

Some more formations:


In addition, there were a bunch of smaller, separate epsom salt needles which formed under at the bottom of each container. I sifted them out with a fork, dried them and put them in a pile. A pink tint can be seen on some of them from the red food coloring:

The food coloring idea did not turn out too well; I would need to add way more than I did for the crystals to be colored. As it is, there is only a very slight red tint on some of the epsom salt needles and a faint blue tint on the largest crystal formation (which isn't noticeable in the pictures).
This time I did manage to apply two coats of clear nail polish on several of the crystals to help preserve them (many sites say they will turn white over time otherwise). Letting them sit for a few hours on a paper towel seemed to help their structural integrity such that they could be handled long enough to apply the nail polish. One still needs to be quite gentle, however. I did lose a few spines here and there during the process.
I put the pile of epsom salt needles in a small zip lock bag for safe keeping. I'm planning on using them for a future experiment, since "seed crystals" can help speed up the crystal growing process and provide a site for the new crystals to begin forming.
No comments:
Post a Comment